Fan Control with ESP32

Fan Control with ESP8266 Node MCU

Fan Control with ESP32

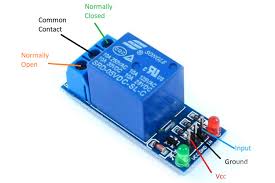
Hey Science Enthusiasts! Get ready for a smoking hot project with the ESP32—literally! We’re building a temperature control system for a homemade smoker that can also be adapted to control a fan or other devices based on temperature for a variety of applications. With an ESP32, a thermocouple, and a bit of coding, you can keep your smoker at the perfect temperature. This project includes a customizable HTML interface to display the information you need. Let's get started!

Materials You'll Need:

  • ESP32: The brain of our control system.
  • MAX6675 Thermocouple: To measure high temperatures accurately.
  • Servo Motor: To mechanically adjust vents or controls based on temperature.
  • SSD1306 OLED Display: To show temperature and system status.
  • Relay Module: To control power to a fan or other device.
  • Resistors, Wires, and Breadboard: For making secure connections.
  • USB Cable: To program the ESP32.

Step 1: Connect the Hardware

Let’s wire everything up!

  • Thermocouple to ESP32:
    • DO to Pin 19
    • CS to Pin 23
    • CLK to Pin 5
  • Servo Motor to ESP32:
    • Control wire to Pin 14
  • Relay Module to ESP32:
    • Control wire to Pin 12
  • OLED Display to ESP32:
    • SDA to default SDA pin
    • SCL to default SCL pin

Note: Ensure all connections are solid to prevent any issues during operation.

Step 2: Code Time!

Power up your creativity with some coding.

  • Set Up Your Arduino IDE:

    • Ensure you have the ESP32 board definitions installed in your Arduino IDE.
    • Install the Adafruit GFX, Adafruit SSD1306, and MAX6675 libraries through the Library Manager.
  • Load the Sketch:

    • Copy the provided sketch into your Arduino IDE. This sketch handles temperature readings, controls the servo and relay based on set temperature thresholds, and updates the OLED display.
  • Customize the Web Interface:

    • Adjust the HTML code within the web server functions to display the desired information. This can be the current temperature, system status, or even historical data.
  • Upload the Code:

    • Connect your ESP32 via USB.
    • Select the correct board and port in the Arduino IDE.
    • Upload the sketch.

Step 3: Test and Deploy

Now, let’s see it in action!

  • Power Up and Test:

    • Connect the ESP32 to a power source.
    • Observe the OLED display as it cycles through different information.
    • Access the web interface through any browser connected to the same network.
  • Calibrate and Monitor:

    • Ensure the thermocouple is accurately reading the temperature of your smoker.
    • Adjust the servo’s range and the relay’s thresholds as needed for optimal control.
🌟 Congratulations! Your ESP32 Temperature Control System is Ready! 🌟

Troubleshooting Tips:

  • Temperature Misreads? Check the connections and placement of your thermocouple.
  • Servo or Relay Not Reacting? Verify the logic in your code and ensure the ESP32 is outputting signals correctly.

This project isn’t just for keeping your smoked meats at the perfect temperature—it can be adapted for many other applications where temperature control is key. Customize the web interface to suit your needs and explore different uses for this versatile setup. Keep experimenting, keep learning, and enjoy the delicious results of your tech-powered smoking!

Leave a Comment

Your email address will not be published. Required fields are marked *

en_USEnglish